Beef Cattle Calving Management
Calving season can be a very intense time for cow-calf producers. It is important to understand the nutritional needs of cows and heifers and be prepared to handle newborn calves properly, say Dr. Jane A. Parish, Dr. Justin D.Rhinehart and Dr. Holly T. Boland, in this Mississippi State University Extension Service report. 14 July 2009
 10 minute read
Adequate planning and preparation can reduce calf loss, which ultimately means more profit for the producer. Using proven management techniques helps ensure a successful calving season .
Manage Nutrition
Adequate nutrition is critical during the last two months of gestation, because most of the fetal growth occurs then. Keep heifers separate from the mature cow herd for best nutritional and breeding management. Heifers are still growing and have higher nutrient requirements than mature cows. Cattle nutrient needs are also impacted by body weight. A beef female’s energy needs for maintenance, growth, and lactation must be met before energy is used for reproduction.
Nutrient requirements of beef females after calving

A cow or heifer that has just calved requires additional nutrients for the first few months after calving. Separate cows and heifers that have calved from their counterparts that have not calved to implement nutritional programs that match the needs of each group. Manage cattle for proper body condition at calving to impact rebreeding rates positively. Cows and heifers in thin body condition at calving time are slower to rebreed, produce less colostrum, and are less likely to wean a live calf. Effective nutritional programs match forage and feed resources to animal nutrient requirements.
Avoid Calving Difficulty
Calf losses associated with calving difficulty can be economically devastating for a herd of any size. In addition to calf losses, weak calves and longer postpartum intervals (the time between calving and return to cycling) can result from difficult calving. Underfeeding cows and heifers before calving does not decrease calving difficulty but can instead reduce calf vigor. Thin cattle may have difficulty calving if they lack muscle and stamina to expel the calf.
Avoiding calving difficulty starts long before the calving season with proper bull selection, proper heifer development, and culling females with extremely small pelvic openings. A calving ease bull should be mated to first-calf heifers. If a significant problem with calving difficulty has been experienced in the past, then it is time to reevaluate the herd sires being used. Keep good calving ease score and birth weight records for evaluating calving difficulty within the herd.
Place cows and heifers ready to calve in a pasture where they can be easily viewed and checked often. Consider the effects of feeding management strategies on calving, because nighttime feeding of cattle results in most of the calves’ being born during daylight hours. Pay special attention to first-calf heifers, because they are the most likely animals in the herd to experience calving difficultly. Place heifers in pastures where they can be most easily viewed. Make sure that cattle approaching calving are near effective cattle handling and restraint facilities, including a squeeze chute with head catch in case calving assistance is needed.
Check that all calving areas are clean and free of items that might injure cattle. Recognize the signs that calving is near. Observe cattle frequently, and have calf pulling and disinfectant supplies readily available. Timing is critical if assistance with delivery is required.
Udder filling, springing (relaxation and swelling of the vulva), and loss of the cervical plug can happen at varying times before calving but indicate that calving is nearing. Relaxation of the pelvic ligaments and strutting of the teats usually occur within 24 hours of calving. Cows and heifers often become uneasy and seek a quiet place as calving approaches. Complete dilation of the cervix, serious straining, and calf delivery normally take 60 to 90 minutes for heifers and 30 to 60 minutes for cows.
Be ready to assist in calf delivery if reasonable progress stops after the feet or water bag appear. In a normal calf presentation, the front feet are presented first, with the bottom of the hooves facing downward and with the head following on top of the knees. Calves presenting abnormally may require repositioning or other delivery assistance. Contact a veterinarian if a calf cannot be safely delivered without help. After calving, monitor cows and heifers for retained placentas.
Calf Processing
Calving Supplies
Make sure calf processing supplies are on hand before entering the pasture or pen to process newborn calves. Good preparation for calf processing includes setting tattoo pliers to the proper identification digits, marking ear tags with desired information, and recording radio frequency tag identification before entering the calving area. Using a calving supply kit is a useful way to organize supplies.
Handling Newborn Calves
When working a newborn calf, keep track of where the calf’s dam is. Some cows and heifers are very protective, and some behave aggressively toward any animal or object approaching their calves. Keep dogs away from cows and heifers that have just calved. Having more than one person involved in calf processing is a good safety measure and makes newborn calf handling much less challenging.
Many producers take a vehicle into calving pastures to make it easier to catch newborn calves and to provide some level of protection from aggressive cattle. The bed of a pick-up truck often provides a good calf working area. When handling calves for processing at birth, it may be safer for both the handlers and calves to restrain each calf by binding three legs together to limit mobility and struggling.
Once a calf is born, make sure it is breathing properly. If a calf is not breathing, clear its nose and mouth of mucous or other obstructions. Stimulate breathing by vigorously rubbing of the calf’s back or by tickling the nostrils to initiate a sneeze. Avoid holding a calf upside down, because this forces the weight of the calf’s internal organs against the lungs and may inhibit lung inflation.
Nursing and Colostrum
Once a calf is breathing properly, allow it time to stand and start to nurse. Observe the calf during its first hours of life, because it is critical for it to get needed colostrum during this time. Signs that a calf has nursed include wet or curled hair around teats and a shiny appearance to teats. Calves need to receive colostrum from the dam as soon as possible (preferably within the first 30 minutes) after birth. With each passing hour, the amount of colostrum in the dam’s milk declines along with the calf’s ability to absorb colostrum. Newborn calves have limited immune function. Colostrum is important for building calf immunity and resistance to diseases such as scours and pneumonia.
It is preferable that a calf receive colostrum by nursing its dam. However, a calf that has undergone a difficult birth or has not had an opportunity to nurse within one to two hours after birth should be fed colostrum. Feed fresh or slowly thawed frozen colostrum at 5 to 6 percent of the calf’s body weight (about 2 quarts for an 80-pound calf) within the first six hours of life. Then feed the same amount again about 12 hours after birth. This may be done using a stomach tube if the calf is too weak to nurse. If a stomach tube is used, take extreme care to ensure that the tube is placed in the esophagus and not in the trachea (airway).
Health Management
Know the signs of a sick calf, including rapid breathing, scours, lowered head and ears, dry muzzle, inside of mouth cold to touch, and abnormal posture. Dip each calf’s naval cord in a 7 percent iodine solution, or use a disinfectant and drying agent spray to prevent naval infection. This is particularly important in heavily used calving grounds. Move the cow-calf pair out to clean pasture as soon as possible to reduce disease exposure. Consult with a veterinarian on a calf scours prevention program and to plan future calf vaccinations and parasite control.
Calf Identification
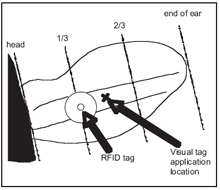
Tag calves at birth with unique animal identification (ID) numbers so they can be matched to their dams and properly identified for herd records. Radiofrequency ear tags can be applied in addition to dangling ear tags by positioning the electronic button toward the base of the ear. Some operations tag all calves in the left ear for easy access when working cattle from the left side through cattle handling facilities. Other operations choose the ear to tag based on the gender of the calf to allow easy calf gender identification at a distance. For instance, all bull calves could be tagged in the right ear, while all heifer calves could be tagged in the left ear.
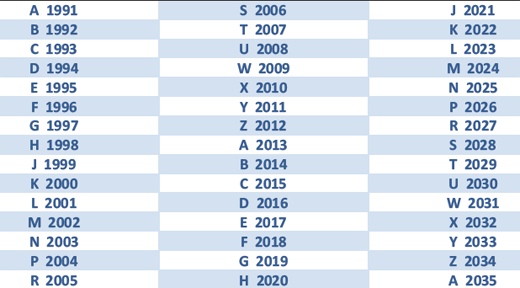
Establish a systematic individual ID system for each operation. The Beef Improvement Federation endorses International Year/Letter Designations for animal ID to denote the calving year with a letter as follows: X = 2010, Y = 2011, Z = 2012, A = 2013, B = 2014, etc. The letters I, O, Q, and V are never used.
To use this system, assign calves the year letter followed by a number indicating birth order, or alternately use the year letter at the end of the ID. A four-digit ID is needed when the operation consists of more than 100 breeding-age females. For example, the tenth calf of 2010 could be identified as X010. Hanging calf ID tags can provide information in addition to the unique calf ID within the herd. Sire and dam ID and calf birth date are common supplemental information included on many calf ear tags.
International year/ letter designations for animal identification
Tattooing is a form of permanent identification sometimes applied to cattle at birth. Take care to place letters and numbers in the tattoo applicator in the proper order and orientation. If in doubt as to whether or not a specific tattoo applicator is properly prepared, depress the tattoo pliers on a sheet of paper or cardboard. Then read the resulting depressions and adjust the tattoo applicator as necessary. When applying an ear tattoo, liberally smear tattoo ink on the inside upper lobe of the calf’s ear. Take care not to tattoo through one of the cartilage ribs in the ear. Check the position of the tattoo pliers, and then depress the pliers firmly. Reapply tattoo ink to ensure a legible tattoo.
Record Keeping
Record calf birth date, sex, and birth weight at calving for use in herd performance improvement programs. A pocket-sized calf record book is a convenient record keeping tool. Record in the calving records any specific conditions or notes of interest, such as twin births.
Measure birth weights within 24 hours of calving. Spring scales and digital scales provide actual birth weight measurements. Attach the scale hook to a rope binding a calf’s legs together or a calf sling. Take care to prevent the calf from slipping out of the sling during the weighing process. For an accurate birth weight measurement with digital scales, be sure the weights of any objects other than the calf on the scale are accounted for and that nothing interferes with the measurement, such as a person’s putting force on the calf or scale. When using a spring scale, make certain the calf is raised completely off the ground.
Calf hoof tapes provide estimates of birth weights instead of actual measurements. Place calf hoof tapes just above the coronary band of a front leg for a proper reading. In seedstock operations, consult with the respective breed association to determine birth weight data collection regulations for use in breed association national cattle evaluation programs. Some breed associations do not accept calf hoof tape records as actual birth weight data.

Example calving record book entries
A cow body condition score and calving ease score can also be easily assigned during calf processing. Beef cattle body condition scoring is discussed in detailed in Mississippi State University Extension Service Publication 2508, Body Condition Scoring Beef Cattle.Calving ease scores are as follows:
Castration, Dehorning, and Implants
Many producers choose to castrate bull calves during processing at birth. Dehorning and implanting eligible calves can also be performed at birth. Calves that may be used as breeding herd replacements should not be implanted. If these management practices are performed when the calf is older, the calf usually experiences more stress and is more difficult to handle with increasing size. Steers do not gain as much weight as intact bulls unless implanted with a growth promoter, but commercial steers typically bring a higher price per pound when marketed after weaning than commercial bulls. Refer to Mississippi State University Extension Service Publication 2485, Growth-Promoting Implants for Beef Cattle, for detailed information on this topic.
Calving Management Conclusions
Good organization by accurate record keeping and using appropriate management techniques before, during, and after calving is essential to build and maintain a successful cow-calf enterprise. Using a controlled breeding and calving season makes it easier to manage the breeding herd in groups and eliminates the need to observe the herd for calving constantly throughout the year. Good management during the calving season improves weaning rates and calf health and productivity. This often leads to higher calf marketing returns. For more information on calving management, contact an office of the Mississippi State University Extension Service.
July 2009