

Some Ways To Indentify Beef Cattle
By Oklahoma Cooperative Extension Service, Division of Agricultural Sciences and Natural ResourcesWhich calf is yours? Which calf belongs to cow 810? Which cows were bred to the new herd sire? If your show steer accidentally got into a pen of steers similar to himself in color and weight, would you be able to recognize your calf?
These questions point out some of the reasons for identifying beef cattle. Also, breed associations require permanent identification for registered animals; and some steer shows require steers to be permanently identified at the time of nomination.
History notes early cattle owners used various methods to mark or “brand” their cattle. They were mainly concerned about ownership. Today, in addition to proving ownership, you want each animal to have an individual identification so you can keep better performance, breeding, and health records.
Some common methods of identifying beef cattle include hide brands (hot iron and freeze branding), ear marks (cropping, notching, or splitting the ear), eartags (metal, plastic, rubberized plastic), neckchains, and straps with numbers, horn brands, and ear tattoos. Another old method used by some major steer shows is the noseprint.
The history and uses of all of these methods are interesting. You may wish to gather detailed information on one or more of these methods and present a 4-H talk or demonstration.
This publication discusses noseprints, ear tattoos, and eartags as ways of identifying beef cattle.
Noseprints
The use of noseprints for identifying cattle is not a new idea. In 1922, Dr. W. E. Petersen, a dairy researcher at the University of Minnesota, gave an extensive report on the methods of obtaining ink noseprints, and the use of these prints in identifying dairy cattle. He presented the following conclusions:- The design on the nose (area from the upper lip to the top of the nostril) is a result of subcutaneous (under the skin) glands which cause distinct elevations or ridges.
- Each design or pattern of ridges and grooves is specific for that individual animal.
- As the animal gets older, the nose becomes larger; however, the pattern of ridges and grooves remains the same.
- Legible or readable noseprints can be used as a means of positive identification and can be made from a small portion of the print.
- The ink noseprinting procedure is simple enough to be practical.
The basic principle of the noseprint method of identification is that no other animal has an identical pattern on its nose. When you are halter breaking or working cattle through your squeeze chute, observe the area between a calf’s upper lip and the top of the nostril. You will see a series of ridges and grooves; and, on close inspection, you will probably see that the patterns are different among animals.
Method
There are two methods for making cattle noseprints. One is the ink method, which is similar to the procedure used by the police in making fingerprints. The other method is to take a black and white picture of the nose with a camera equipped with a closeup lens.The equipment and materials you will need for obtaining an ink noseprint are:
- Terry cloth towels or quality paper towels.
- Stamp pad. (The regular office supply 3” x 4 1/2” felt pad is large enough.)
- Black, fast-drying stamp pad ink.
- Headgate, preferably with a squeeze chute.
- Index cards, 3” x 5” or 4” x 6”, nonlined standard grade (dull finish). A slick-finished card or paper will result in a smeared print.
- A 1/4 inch thick piece of wood similar in size to the index card.
- Place the animal in a headgate.
- Stand to the right of the animal’s head, and reach over and around the neck with your left arm to restrain the head. You may have to use the halter to pull the head to one side
- Use the towel to dry thoroughly the hairless area of the muzzle.
- Immediately cover the hairless area with the black ink. For good results, start the edge of the pad at the edge of the upper lip and roll the pad upward toward the animal’s face.
- Using the piece of wood as a support, immediately press the index card against the muzzle and lift the print. You can get good prints by placing the lower edge of the index card at the edge of the upper lip and then rolling it upward toward the animal’s face.
- If the print is smeared because of movement or perspiration from the nose, repeat the steps.
- Label the index card with the owner’s name, the animal’s tattoo/tag number, and the date.
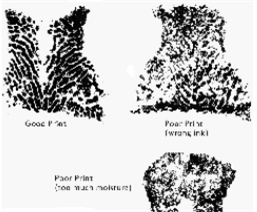 |
| Figure 1. Examples of noseprints |
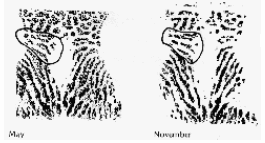 |
| Figure 2. Noseprints from the same steer |
Remember these two important steps to get good noseprints: thoroughly dry the muzzle before applying the ink, and quickly lift the print before perspiration appears. Moisture will cause the ink to run, and this will result in a smeared print. Figure 1 shows examples of a good print, a poor print due to excessive moisture, and a poor print due to the wrong ink.
Figure 2 shows two noseprints from a young growing steer. The print on the left was taken in May, and the print on the right was taken in November of the same year. Note how the distance between the ridges increased with growth; however, the pattern remained the same.
The areas circled were used to make a positive match on these two prints. The key to matching prints from the same animal is to locate a unique-shaped ridge on each print and then to match several ridges surrounding it. You can find positive matching, using areas no larger than a nickel.
Use
You can use noseprints to identify beef cattle positively. Some countries are using noseprints to identify stolen cattle. Some national and state steer shows require that steers be nominated several months before the show and that nose- prints accompany the nomination forms. Noseprints taken at the show are matched with the nomination prints to make certain that the steers are the same and the ownership requirements have been met.
Tattoos
This method of identifying cattle involves the use of needle points in the shape of letters and numbers to pierce the front surface of the ear. You rub special indelible tattoo paste or ink into the pierced area. As the punctures heal, the ink or paste is trapped under the surface of the skin, and it shows up as the numbers/letters, which can be used when registering cattle. If you do the job properly, tattoos will remain in the ear throughout the life of the animal and they do not scar the animal.Method
Here are some important steps and considerations in tattooing.- If you are registering cattle with a breed association, find out exactly what kind of numbering and identification systems the association uses and what information goes in each ear. This is extremely important.
- Buy the type of tattoo pliers, numbers, letters, and tattoo ink or paste that will meet your needs. Use green ink or paste for black cattle, and black ink or paste with the other breeds. Figure 3 shows one type of tattoo pliers.
- Be sure you have proper working facilities or enough assistance to hold the calf and prevent sudden movements of its head. It is easier to tattoo baby calves, and there is less chance for record errors if you tattoo calves shortly after birth. Take proper precautions to avoid personal injury by the cow.
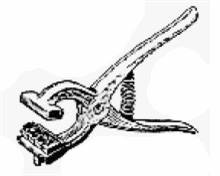
Figure 3. One type of tattoo pliersnominated
-
To develop your tattooing skills, you may want to practice on cattle that you plan to sell for slaughter.
- Select the numbers/letters for your first calf and place them in the tattoo pliers. Be sure they are in the proper order by punching a piece of paper. It is a good idea to do this before tattooing each animal.
-
Hold the calf and select the spot in the ear where you plan to put the tattoo. Avoid hairy areas, pigmented areas, the edges of the ear, and cartilage ribs. A tattoo in the hairless area the top rib will allow you more flexibility for using eartags and the new fly/tick control tags. Figure 4 shows an ear with a tattoo and an eartag.
- Clean the area of the ear to be tattooed with a cloth and a compound, which will kill viruses. Since the virus causing warts can be transmitted to the ear by tattooing equipment, you should disinfect the equipment with the compound after each use. If you cannot do this, at least be sure to disinfect after each job and before using it on a different herd. Wipe the excess compound from the ear and the equipment, so it will not affect the ink or paste. Ask your veterinarian for information on a compound that is available and safe for you to use.
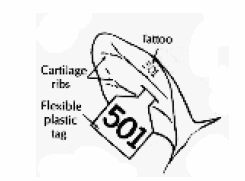
Fig. 4. A good tattoo and eartag in the same ear
-
Insert the ear between the jaws of the pliers with the numbers/letters on the inside of the ear. Close the pliers quickly and firmly and then release quickly to avoid tearing the ear.
- Smear the ink or paste over the punctures and rub it with your thumb or brush with an old toothbrush until each puncture is filled. Take extra time to rub the ink or paste in below the surface of the skin. Failure to do this is a frequent reason for poor tattoos.
- Record the identification information in a pocket record book. Include the tattoo number, the birth date of the calf, the number of the sire, and the number of the dam. Transfer the information to your permanent record book immediately.
Use
Most cattle breed associations require that animals be tattooed before they can be accepted for registration. Some associations have specific guidelines concerning the use of numbers and letters, and what information goes in each ear. Again, it is important you get this information from your breed association before you tattoo the calves you plan to register. Fig. 4. A good tattoo and eartag in the same earTattoos are useful for permanent identification; however, you have to restrain the animals in order to read the tattoos. A poor job of tattooing will produce tattoos that are hard to read.
Eartags
Eartags can usually be classified into one of three styles: one-piece plastic, two-piece plastic, and metal. These tags vary in shape, size, color, and method of attachment to the ear. In most cases you will use a special tool, knife, or pliers to pierce the ear and pass a portion of the tag through the ear. A basic reason for using plastic eartags is to identify the animal from a distance. Therefore, you should consider size and color combinations. When you are using plastic tags, it is a good idea to number both sides.Method
Since so many types of tags are available, limit your consideration at this time to some of the basic steps involved in selecting and attaching eartags.- Determine what type of numbering system you will use to identify your cattle. Some producers use the first digit in the number to represent the year and the next two or three digits to represent the order in which the calves are born; for example, you could assign 401 to the first calf born in 2004.
- Visit with your Extension educator and cattlemen in your area to learn which tags have a high success rate. Discuss cost, ease of application, and other factors.
- Visit a livestock supply store, examine the tags available, and select the type that will meet your needs. Most manufacturers provide prenumbered and blanktags in several colors. You can buy special marking pens to apply numbers to the blank tags. You can use colored tags to identify calves sired by a particular bull. Colored blank tags give you considerable flexibility in developing your own identification system. You can put the animal’s number on the bottom of the tag and put the numbers of the sire and/or dam on the top.
- Make sure you get the correct tool, knife, or pliers needed to install your type of tag. Some tags are attached to the ear with a special rivet-type button. If you select that type of tag, you will need to purchase enough buttons.
- Most tag manufacturers provide printed instructions on how to attach their tags properly. Ask for the instructions when you purchase your tags. You must attach the tags to the ear in a certain way and in a certain location. This makes it easy to see the tag, and fewer tags will be lost. Therefore, follow the manufacturer’s recommendations.
- Ask an experienced adult to show you how to install your tags properly and to assist you until you become experienced.
- Select the ear to be tagged. Your handling facilities will determine this to some degree. If you are working your cattle from the right side, put the tag in the right ear.
- To do a good, safe job of ear tagging, you must restrain the animal so that it cannot move its head. The best way to do this is to use the headgate and squeeze chute. Caution! Most of the tools used to insert eartags through the ear are sharp. Be careful and avoid injury to yourself and to your animal. Figure 4 shows a method of attaching a permanently bent bar, flexible plastic tag, and Figure 5 shows the use of a straight bar tag.
-
Treat the pierced ear around the tag with an antiseptic compound to prevent infection.
- After you have properly installed the tag, record the identification information: You should use a record system similar to the one suggested for use with tattoos. To get the most out of your identification system, you must have written records.
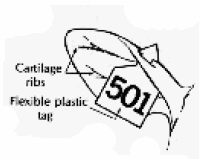 |
| Fig. 5. Proper attachment of a straight bar eartag. |
Use
Eartags that are large enough to be read from a distance provide an excellent way to identify cattle quickly and easily. Colored blank tags give the cattleman a great deal of flexibility in designing a custom identification system to meet a variety of needs. One of the problems with eartags is that some will be lost. To reduce record problems, replace lost tags immediately. Many producers prefer to use a tag in combination with tattoo or brand. If you use two or more identification methods, it is important that you use the same numbering system for all.Activities
- Learn the specific identification requirements (brand, tattoo, numbering system) for registration in the breed of your choice.
- Visit a livestock supply store and look at the various materials and equipment used to identify beef cattle.
- Visit a beef cattle operation and observe branding, ear tagging, and tattooing operations.
- With the help of your leader, get noseprints of some cattle the next time you have them in a squeeze chute. Take two prints from two or more animals, and try to match the prints.
- Give a talk or demonstration on some of the methods used to identify cattle.
- With the help of your volunteer leader, develop your tattooing and ear tagging skills by practicing on some market cattle.
Questions
- Why is it important to dry the skin before applying ink for a noseprint?
- Explain the purpose of ear tattoo ink or paste.
- Give an advantage and disadvantage of ear tattoos.
- Give an advantage and disadvantage of eartags.
- List some of the factors that you should consider in selecting an identification system.
- Explain a numbering system that could be used with a small beef herd.
Other Resources
- Breed association publications related to tattooing and other identification systems.
- Publications provided by eartag manufacturers.
- Local County Extension Educator at http://agweb/okstate.edu/fourh/ and open links.


